
NON-DESTRUCTIVE TESTING (“NDT”)
DEFINITION
Non-destructive testing (NDT) is a suite of techniques used to evaluate the properties of a material, component, or system without causing damage. It’s vital for detecting defects, ensuring quality, and assessing structural integrity in industries such as aerospace, manufacturing, and construction. Key methods include ultrasonic testing (using high-frequency sound waves), radiographic testing (using X-rays or gamma rays), magnetic particle testing (identifying surface and near-surface discontinuities in ferromagnetic materials), and liquid penetrant testing (exposing defects open to the surface by capillary action). Each method has specific applications, advantages, and limitations, chosen based on the material properties and the type of information needed.
WHAT FLAWS CAN BE SPOTTED BY NDT?
WHO EXECUTES NDT?
Non-destructive testing (NDT) is typically executed by trained and certified technicians who specialize in the various NDT methods. These professionals possess a deep understanding of the principles behind each technique, as well as the skill to interpret results accurately.
Depending on the complexity of the test and the industry, technicians may need certifications from recognized bodies, such as the American Society for Nondestructive Testing (ASNT), to ensure they meet the standards for performing NDT safely and effectively.
Third-party inspectors may also perform non-destructive testing (NDT) to provide an independent evaluation of materials, components, or structures. These external inspectors ensure unbiased results, adhering to industry standards and regulations. Their expertise covers various NDT methods, ensuring compliance, safety, and quality. Third-party NDT is crucial in industries where failure risks are unacceptable, like aerospace, oil and gas, and construction, providing confidence in the integrity of critical components without any conflict of interest.
NDT VS. DESTRUCTIVE TESTING
NDT (Non-Destructive Testing) evaluates materials and structures without causing damage, allowing for future use. It’s used for regular maintenance and inspection. Destructive testing, on the other hand, evaluates material properties by taking it to failure, providing comprehensive data on strength, durability, and performance. While NDT is crucial for ongoing maintenance and safety checks, destructive testing is vital for initial material selection and design verification, sacrificing a part to ensure a component’s integrity.
WHAT IS THE BEST NDT?
There isn’t a single “best” non-destructive testing (NDT) method, as each technique has its advantages and limitations depending on the specific application, material, and defect being inspected. The most appropriate NDT method varies based on factors such as the type of material being tested, the size and location of defects, the required sensitivity, and environmental considerations.
For example:
- Ultrasonic Testing (UT) is excellent for detecting internal flaws in thick materials or welds.
- Radiographic Testing (RT) is effective for inspecting the internal structure of dense materials but involves radiation safety considerations.
- Magnetic Particle Testing (MPT) is suitable for surface and near-surface defects in ferromagnetic materials.
- Liquid Penetrant Testing (LPT) is useful for detecting surface-breaking defects in non-porous materials.
Choosing the best NDT method often involves a combination of factors, including the specific requirements of the inspection, the available equipment and expertise, and any regulatory or safety considerations. It’s common for multiple NDT methods to be used in combination to provide comprehensive inspection coverage and ensure the integrity of critical components.
THE 6 KEY TYPES OF NON-DESTRUCTIVE TESTING
The major types of non-destructive testing (NDT) include:
- Visual Inspection: This involves the simple visual examination of the product or weldings
- Liquid Penetrant Testing (LPT): Reveals surface-breaking defects in non-porous materials by using a dye.
- Magnetic Particle Testing (MPT): Detects surface and near-surface discontinuities in ferromagnetic materials.
- Ultrasonic Testing (UT): Uses high-frequency sound waves to detect internal flaws or characterize materials.
- Radiographic Testing (RT): Employs X-rays or gamma rays to visualize the internal structure of a component.
- Eddy Current Testing (ECT): Uses electromagnetic fields to detect surface and sub-surface defects in conductive materials.
Let’s now delve into the details of each major type
VISUAL INSPECTION (VI)
Visual inspection in non-destructive testing (NDT) is a basic yet critical examination method where an inspector uses their eyes, possibly with the aid of magnifying glasses or other tools, to evaluate the surface condition of a material or structure. It’s often the first step in NDT, identifying visible defects like cracks, corrosion, and alignment issues. While seemingly simple, it requires a trained eye to detect subtle signs of potential failure, making it an indispensable part of maintenance and quality control processes across various industries.
Visual Inspection of welds:
Visual inspection is the simplest and the cheapest non-destructive test and all welds must be subject to this basic method, using either the naked eye or special magnifying glasses to assess possible imperfections.
All surfaces to be visually examined must be thoroughly cleaned. This method is used only to detect surface imperfections.
If some imperfections are found, additional tests shall be undertaken to discover the extent of the flaws.
LIQUID PENENTRANTS TESTING (LP)

Liquid Penetrant Testing (LPT) is a non-destructive testing method used to detect surface-breaking defects in non-porous materials, such as metals, plastics, and ceramics.
The process involves several steps:
Surface Preparation: The surface of the material being tested is cleaned to remove any contaminants that could interfere with the test results.
Application of Penetrant: A liquid penetrant, often a colored dye, is applied to the surface of the material. This penetrant is drawn into any surface defects by capillary action.
Penetrant Dwell Time: The penetrant is left on the surface for a predetermined period, allowing it to seep into any cracks, voids, or other defects.
Excess Penetrant Removal: After the dwell time, the excess penetrant is removed from the surface using a solvent or emulsifier.
Developer Application: A white developer powder or aerosol is applied to the surface. The developer draws the penetrant out of any defects, making them visible against the white background.
Inspection: The surface is inspected visually under appropriate lighting conditions. Any indications of defects, such as colored dye bleeding out of cracks, are noted.
Liquid Penetrant Testing is relatively simple, cost-effective, and can detect surface flaws that may not be visible to the naked eye. However, it is limited to detecting only surface-breaking defects and is not suitable for porous materials or components with complex geometries.
Liquid penetrants are a low-cost test to detect cracks or abnormal porosity on the surface of the equipment.
Source: Techcorr
MAGNETIC PARTICLES (MP)

Magnetic Particle Testing (MPT) is a non-destructive testing method used to detect surface and near-surface flaws in ferromagnetic materials, such as iron, steel, and nickel. The process involves magnetizing the material and applying magnetic particles to the surface, which are attracted to and accumulate around discontinuities, making them visible to an inspector.
The steps involved in Magnetic Particle Testing are as follows:
Magnetization: The component being tested is magnetized using a magnet or electromagnet. This magnetization creates magnetic field lines within the material, which reveal any surface or near-surface defects.
Application of Magnetic Particles: Magnetic particles, typically in the form of a dry powder or suspended in a liquid carrier, are applied to the surface of the magnetized component. These particles are attracted to and accumulate around areas of magnetic flux leakage caused by defects.
Inspection: The surface is visually inspected under suitable lighting conditions. Accumulations of magnetic particles form indications, or “indications,” that indicate the presence of defects such as cracks, laps, seams, or inclusions.
Magnetic Particle Testing is widely used in industries such as manufacturing, aerospace, automotive, and construction for the detection of surface defects in ferromagnetic materials. It is relatively fast, cost-effective, and can detect defects both on the surface and just below it, making it a valuable tool for ensuring the integrity of critical components. However, it is limited to ferromagnetic materials and surface defects, and the components being tested must be magnetizable.
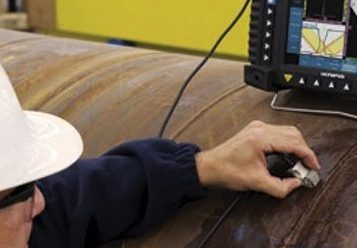
ULTRASONIC TEST (UT)

Source: Techcorr
RADIOGRAPHIC TESTING (RX or RT)

Radiographic Testing (RT) is a non-destructive testing method used to examine the internal structure of materials for flaws, defects, or inconsistencies. It involves passing X-rays or gamma rays through a component and capturing the resulting image on a film or digital detector.
The steps involved in Radiographic Testing are as follows:
Source Setup: A radiation source, typically an X-ray machine or a gamma-ray projector, is positioned on one side of the component being tested. The radiation penetrates the material and interacts with it, producing a shadow image of the internal structure.
Film or Detector Placement: A film cassette or digital detector is placed on the opposite side of the component to capture the radiation that passes through. The film or detector records the intensity of radiation that reaches it, forming an image.
Exposure: The radiation source is activated, and the component is exposed to the X-rays or gamma rays for a predetermined period. During this time, the radiation penetrates the material and produces an image on the film or detector.
Image Development: For film-based radiography, the exposed film is processed using chemical development techniques to reveal the internal structure of the component. For digital radiography, the captured digital image is processed and analyzed using specialized software.
Interpretation: The developed radiographic image is examined by trained inspectors to identify any indications of flaws or defects, such as cracks, voids, inclusions, or thickness variations.
Radiographic Testing is widely used in industries such as aerospace, automotive, construction, and manufacturing for the detection of internal defects in materials and components. It is capable of revealing flaws that may not be visible to the naked eye, making it a valuable tool for ensuring the integrity and reliability of critical structures and components.
(Source: Peter Smith – Piping Materials Selection and Applications, 2004)
EDDY CURRENT TEST (EC)

Eddy Current Testing (ECT) is a non-destructive testing method used to detect surface and subsurface defects, as well as to measure conductivity and thickness in conductive materials. It works based on the principle of electromagnetic induction, where a coil carrying an alternating current generates eddy currents in the material being tested.
The interaction between these eddy currents and the material’s electromagnetic field produces changes in impedance, which can be detected and analyzed to identify defects or variations in material properties.
The steps involved in Eddy Current Testing are as follows:
Probe Setup: A probe containing a coil or coils is positioned close to the surface of the material being tested. The probe generates an alternating magnetic field that induces eddy currents in the material.
Eddy Current Generation: The alternating magnetic field induces eddy currents in the conductive material, which penetrate the material to a certain depth based on the frequency and properties of the material.
Interaction with Material: The eddy currents interact with the material’s electromagnetic field, causing changes in impedance. Variations in impedance can result from defects, changes in material thickness, or variations in material conductivity.
Signal Detection: Changes in impedance are detected by the probe and converted into electrical signals. These signals are then amplified, filtered, and analyzed to identify and characterize defects or variations in material properties.
Interpretation: The signals obtained from the Eddy Current Testing are interpreted by trained inspectors to determine the presence, location, size, and nature of any defects or variations in material properties.
Eddy Current Testing is commonly used in industries such as aerospace, automotive, manufacturing, and power generation for the detection of surface and subsurface defects, measurement of conductivity and thickness, and sorting of materials based on their electrical properties. It is a versatile and sensitive technique capable of detecting a wide range of defects and variations in conductive materials, making it a valuable tool for quality control and inspection purposes.


14 Responses
Great blog post on the different types of non-destructive testing (NDT)! The explanations were clear and concise, and the post provided a valuable overview of the applications and benefits of each NDT technique. Highly informative and educational!
PCTE Industrial offers non-destructive testing (NDT) equipment to fulfil any of your testing needs be it in Industrial or Construction NDT.
Our product range includes Ultrasonic Probes and Testing instruments from Doppler NDT, GB Inspection systems, Proceq and Dolphitech, Uniwest’s range of Eddy Current probes and test equipment, REL UV lamps and a broad range of visual inspection, coating inspection and metal hardness testing equipment. Contact us today for any industrial NDT needs.
For more detail visit us : https://www.industrial-ndt.com/
Excellent Post, Also read our blogs on Fasteners Manufacturers,High Tensile Fasteners Manufacturer, Inconel Fasteners Manufacturer, Monel Fasteners Manufacturer, also visit Ananka Groups
Nice Blog,also check Flange Supplier in Dubai , Flange Supplier in Abu Dhabi and Flange Supplier in Sharjah and visit our website Inco Special Alloys
Informative information Thanks for sharing
The types of non-destructive testing expressed in the post is incredible. Thanks for sharing such valuable information!
Very informative post about non-destructive testing types. Images and videos are very helpful to understand. Thanks for sharing this with us!
Good Info,
Anyone has idea on DX inspection process?
It was great to peruse that ultrasonic testing is compact, which makes it valuable for provincial zones. One of my uncles requires a non-ruinous testing administration, yet I don’t know which strategy will work best for his undertaking. I will assist him with finding an expert for more alternatives, so a debt of gratitude is in order for the depiction.
Very informative post! In my opinion, ultrasonic testing is one of the most fascinating NDT methods because it is so multifaceted. I actually just read another blog post about ultrasonic testing and it is very advanced but very accurate like you mention.
It was awesome to read that ultrasonic testing is portable, which makes it useful for rural areas. One of my uncles requires a non-destructive testing service, but I’m not sure which method will work best for his project. I will help him find a professional for more options, so thanks for the description.
Thank you for your appreciated comment. Should you need further information on some specific topics, kindly send us an email to support@projectmaterials.com. To submit an RFQ for piping materials, please visit this page: https://projectmaterials.com/submit-rfq-mto. Best regards, Projectmaterials
Type of crack
Our company uses the most common method for NDT, such as Visual and Optical Testing (VT).